

Introduction
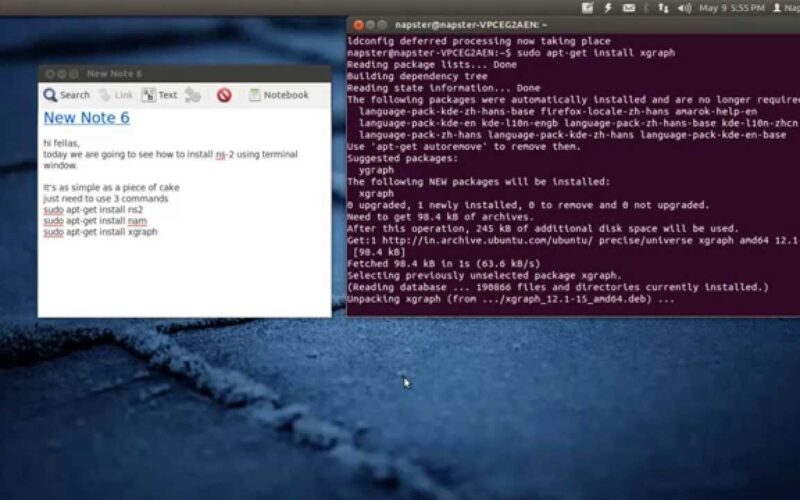
In this tutorial, we will walk through the steps required to install NS2 on Ubuntu 12.04 64-bit edition. You will be guided step by step through this installation which includes two different file openers for easier navigation and live help in the process sould you need it.
If you are a Linux user and want to install the Natural Source server software on Ubuntu, this guide will outline the steps for you. This NS software is a great choice for managing your email and news sources, and making sure that you have up-to-date information without leaving your desktop.
First, make sure that you have the latest version of Ubuntu installed on your computer. Once you have done that, open up a terminal window and enter the following command:
sudo apt-get update && sudo apt-get upgrade
This command will ensure that you have the latest security and bugfixes installed on your machine. After you have completed the update process, it is time to install NS. Run the following command:
sudo apt-get install nsserver
This will install NS onto your system. When the installation process is complete, run the following command to start the NS server:
nsserver -f
This command will start the NS server on your system and allow you to access it from anywhere on your network. If everything goes according to plan, you now have everything set up to use NS on Ubuntu!
Installing the NS2 Installer (Windows)
If you are looking to install the NS2 Installer on Ubuntu, we have a guide for you!
First, you will need to get the NS2 Installer. You can download it from our website or from the project’s releases page. Once you have the installer, open it up and click on the “Install” button.
Next, you will need to create a new user account for NS2. This is optional, but recommended if you want to keep your installation safe. To do this, click on the “Create User” button and enter a username and password. Be sure to remember these credentials!
After you have created your user account, click on the “Finish” button and wait for the installation process to finish.
Once the installation is complete, open up a terminal window and type in the following commands:
cd ~/ns2-installer
sudo ./ns2-installer -i <path_to_niforms_dir>
These two commands will install NS2 onto your machine!
Download, Extract and Install NS2 on Ubuntu 12.04
NS2 is a revolutionary new program that provides organizations with powerful and easy-to-use networking tools. NS2 is open source software, so you can be confident that it is reliable and secure.
This tutorial will show you how to install NS2 on Ubuntu 12.04. Before you begin, make sure that you have downloaded and installed the correct dependencies.
First, download the NS2 installer file from the official website. After downloading the file, uncompress it using the following command:
unzip nsq-release-linux-x64.zip
Next, launch the NS2 installation script by executing the following command:
./nsq-installer.sh -i nsq-release-linux-x64/bin/nsexec -n YOURDOMAIN -t YOURUSERNAME -p YOURPASSWORD
After running the installation script, you will be prompted to provide various information regarding your installation. Feel free to review the options available before continuing.
Next, you will need to extract the contents of the downloaded NS2 installer file into a new directory. To do this, use the following command:
cp -r nsq-release-
Before you Download Code(s) Manager and Configure NS2
If you’re looking to install NS2 code manager and configure it on Ubuntu, the following are some tips that will help.
First, make sure that you have the correct software prerequisites installed. You’ll need the following packages:
NS2 code manager
sudo apt-get install libnsdl3-dev libnsqlite3-dev libxml2-dev
Second, download and install NS2 code manager. The following command will download and install NS2 for you:
NS2 Code Manager installation script wget https://raw.githubusercontent.com/codebutcher/ns2cm/master/install.sh -O install.sh chmod +x install.sh ./install.sh
Third, once the installation is complete, launch the NS2 code manager by entering the following command:
NS2 Code Manager ./install.sh
Fourth, enter the following configuration information to set up NS2:
NAME: ns2 CM USERNAME: your_ns2_cm_username PASSWORD: your_ns2_cm_password ADMIN user: admin@localhost ADMIN port: 8085 DOWNLOAD PATH
Forcing Your Firewall to Allow Through Change of Destination IP Addresses on Ubuntu
- To allow NS through your firewall, open the Firewall Settings on Ubuntu by typing “firewall-settings” in the Terminal.
- In the Firewall Settings, click on the Allow tab and select NS from the list of allowed protocols.
- Click OK to save your changes and exit the Firewall Settings.
Configuring NS2 with your Source Code Manager: peaking in through Tor/obfs/anonymizing Proxy Browser
Configuring NS2 with your Source Code Manager can be a little daunting at first, but once you have it setup it will make working with your source code much easier. Peaking into code repositories or tracking changes can now be done anonymously or through a proxy if needed. Here we’ll go over how to configure NS2 for use with your SCCM solution.
Editing Peering Settings

- To install NS on Ubuntu, first you need to edit your peer settings.
To edit your peer settings, open the NetworkManager app in Ubuntu and click on the Connections entry.
Under the General tab, click on the Edit button next to the Physical Network Entry.
This will open up a new window where you can find your physical network interface. Select it and click on the Properties button.
Under the Peering tab, you will see two entries: one for Established Peers and one for Upgraded Peers.
Click on the Established Peers entry and edit its settings. Under the General tab, change the Server Alias to ns1.example.com . This is the hostname of our NS server.
Next, enable IP spoofing by clicking on IP Spoofing and entering 127.0.0.1 into the IP Address field. This is our NS server’s localhost address.
Next, add your NS client’s hostname ( ns2.example.com ) into the Host Name field and enter its corresponding IP address into the Address field.
Note that we have used two
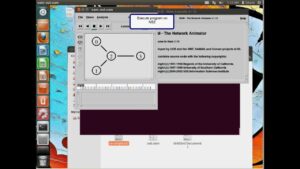
Installing NS2 On Ubuntu 12.04
If you’re looking to get your feet wet with Next Step Solutions (NS2), we’ve got a simple guide for you — just check out this blog post!
First, we’ll take a look at the basics of installing NS2 on Ubuntu 12.04 LTS. After that, we’ll explain how to install it using our new NS2 installer app .
If you’re unfamiliar with Next Step Solutions, NS is a comprehensive software development platform that connects teams of developers from around the world. NS is used by companies like Google, Facebook, and Airbnb to build their complex web applications.
NS is a powerful toolkit that can make developing web applications much more efficient. In this blog post, we’ll show you some of the basic features of NS2 so that you can get started using it on Ubuntu.
sudo add-apt-repository ppa:nginx/stable
If you want to use the Nginx web server as your default web server on Ubuntu, you need to install the recent NS-2.35 package from the official Ubuntu repositories. This article will show you how to do that in 4 easy steps.
First, open a terminal window and type the following command:
sudo apt-get update && sudo apt-get upgrade
This will bring down the latest security updates and install the necessary packages for installing NS-2.35. Next, we need to add the NS repository to our Ubuntu installation. To do that, type the following command: