

We’ve all had this happen to us, when we finally realize that our bookmarks are nearly unmanageable due to how they’re scattered on our home screen. Luckily, Chrome browser lets you rearrange the order of your bookmarks right in the browser – because who doesn’t like a challenge?
What is Chrome Browser?
Chrome Browser is a web browser that was first released in 2008. The app has been used by more than 150 million people and is available on Android and iOS. Chrome Browser includes features such as incognito mode, password manager and ad blocker.
How to Reorder Bookmarks in Chrome Browser on Android
If you’re like most people, your Chrome browser on Android is cluttered with bookmarks that are in no particular order. Thankfully, there’s an easy way to reorganize them – just follow these simple steps:
1) Open Chrome on your Android device and click the three lines in the top right corner of the screen.
2) Select “Settings” from the menu that pops up.
3) Under “User Settings,” click on “Bookmarks.”
4) On the left side of the window, near the bottom, you’ll see a list of categories. Scroll down and find “Bookmarks Order.” You can drag it to a new location on the screen if you want to reorganize it.
5) Close the Bookmarks settings window by clicking the X at the top right of it.
HD Video Guide: How to Reorder Bookmarks in Chrome Browser on Android
Benefits of Utilizing the
“Reorder Bookmarks” Feature in Chrome
If you have tons of bookmarks saved in your Chrome browser on your Android phone or tablet, it can be a hassle to organize them into folders or other manageable groups. With the “Reorder Bookmarks” feature, you can easily reorganize your bookmarks by drag-and-dropping them into desired folders. Here are some benefits of utilizing this feature:
- It makes bookmarking more efficient and easier to access.
- You can target specific bookmarks for easy retrieval.
- It can help you better manage your online reading sessions.
- It helps keep your screen clean and clutter-free.
Chrome Browser on Android
If you’re like most people, you rely on the Chrome browser to help you stay connected and organized online. Not only is Chrome one of the most popular browsers out there, but it’s also available for Android devices. That means you can keep your information organized and readily accessible wherever you go.
If you’re not sure how to reorder bookmarks in the Chrome browser on Android, this guide is for you. By following these simple steps, you’ll be able to customize your browsing experience and make sure that all of your favorite websites are at your fingertips.
First things first: open the Chrome browser on your Android device. If you don’t have it installed yet, head over to the Google Play Store and download it.
In Chrome, click on the three lines in the top right corner of the window (known as the menu bar).
Select “More tools.”
Near the bottom of the “Tools” menu, select “Bookmarks.”
At the bottom of that screen, below “Bookmarks entries,” scroll to see all of your bookmarks listed separately. You’ll see a list of folders (on Windows) or groups (on Mac) that correspond to your websites
Other Tips
If you’re like many people, you love to reorganize your bookmarks on a regular basis. But sometimes Android’s built-in bookmarking tools just don’t cut it – or you want to do something a little differently on your phone or tablet. Here are four ways to reorder bookmarks on Android:
- Use the hamburger menu.
- Drag and drop.
- Use the shortcut keys.
- Use the nav bar.
- Use the hamburger menu.
To quickly reorder your bookmarks using the hamburger menu, open up Chrome and click on the three lines in the top left corner of the window (or swipe from top to bottom). Then, click on “Bookmarks,” and then on “Bookmark Menu.” From here, you can drag and drop individual bookmark folders into place, or reorder them all at once using the arrow buttons in the top row (it’s important to remember to hit “Save Changes” after making your changes!).
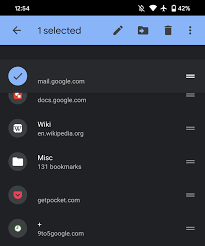
- Drag and drop.
Another quick way to rearrange your bookmarks is by dragging and dropping them into place – simply drag one bookmark folder onto another and they’ll both be moved automatically!
Remove Bookmarks
If you want to remove a bookmark from Chrome on your Android device, follow these simple steps:
- Open Chrome on your Android device and click the three lines in the upper right corner of the browser window.
- On the left side of the window, under “History,” click “Bookmarks.”
- On the right side of the window, near the bottom, you’ll see a list of all your bookmarks. Near the top of the list, under “Website folder,” tap and hold on the bookmark you want to remove.
- Drag and drop the bookmark onto the trash can icon at the bottom of the window.
Add Bookmarks
If you use Chrome on your Android device, you may have noticed that the order in which your bookmarks are displayed can vary from device to device. In this guide, we’ll show you how to reorder your bookmarks on Chrome for Android, so that they are all displayed in the same order on all of your devices.
To reorder your bookmarks:
1) Open Chrome on your Android device.
2) Click the three lines in the top-right corner of the browser window.
3) Select “Settings.”
4) Under “User Profile,” select “Bookmarks.”
5) In the “Bookmarks” section, click on the “+” icon next to “Bookmarks.”
6) On the new window that opens, select “All Sites.”
7) In the “Bookmarks” section of this window, drag and drop the bookmarks that you want to move into the desired location. Make sure that each bookmark is placed in its own row and that they are all placed in ascending order (from bottom to top). When you’re finished, click OK.
8) Restart Chrome if it was closed while you were reorganizing your bookmark list.