


This article provides tips and tricks for making an easel from a step ladder. Tips include taking off the paint of the ladder and chasing away squeaky hinges.
What is an easel?
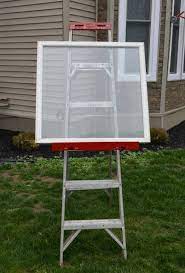
An easel is a versatile piece of furniture that can be used to create paintings, drawings, and sketches. It is a stand that typically has a Paint Tray on one side and a Hook on the other. The Paint Tray can hold different types of paints, while the Hook can be used to hang art pieces.
Types of easels
There are a few types of easels that you can make from a step ladder. L-shaped easels are the easiest to build, and they’re great for smaller spaces. A V-shaped easel is more versatile, and it’s perfect for larger spaces. You can also make a U-shaped easel if you have enough space.
The most important factor when building an easel is the height of the ladder. You need to make sure the ladder is high enough so you’re able to work comfortably. Once you have the height of the ladder figured out, you can choose which type of easel to build.
If you don’t have any space on your wall or floor, you can use an old suitcase as an easel. Simply locate a spot on the suitcase where you want it to stand, and then cut two holes in the top. You can then attach the stand using screws or velcro.
What materials to use for making an easel?
Making an easel is easy with a step ladder! Here are the materials you’ll need:
1. A sturdy step ladder
2. Paint or a drawingsurface
3. Canvas paper or other material to mount the easel on
4. Rubber bands or metal wire to secure the canvas or paper to the easel
How to choose the right size of your step ladder

Making an easel from a step ladder is not as difficult as it may seem. The key is to decide on the right size for your needs.
Before you can choose the proper size, you must first determine the length of the step ladder you will be using. Always measure from one end of the ladder to the other, making sure to include both the rungs and the platform at the top.
Next, figure out how many steps your ladder has. This will give you an idea of the width of the platform. Keep in mind that this width may be different than what you need, so make a copy of your measurements and place them on different pieces of paper in case you need to change something later on.
Once you have these two dimensions, it’s time to find a piece of plywood that will fit both dimensions comfortably. You can use단말 Kayak펜이(china paper) or a wooden panel 제2편 (1/4 inch thick). Place your plywood on top of your ladder with your measurements facing down. Use graph paper창과 (graph paper) or just about anything else that will help illustrative scale 약화위치의 내용을 가르친다.
Now it’s time to cut out the plywood. Make sure to leave about a 1/4 inch border on all four sides so that you can attach the step ladder to the wall. Also, be sure to leave enough space in between each step and the next so that you can easily step onto them.
Finally, drill two 1/8 inch holes in each corner of your plywood and screw in the step ladder onto the holes. Be sure to use high-strength screws because you’ll be hanging weight from your ladder frequently.
How you can decorate your easel
It can be easy to take your easel for granted, but there are a few simple ways you can spruce it up and make it look more interesting. One way is to add an extra layer of decoration by using a step ladder as your easel base. Not only will this look unique and cool, it will be a great way to store your painting materials in easy reach. Just make sure to use caution when heightening the ladder – you don’t want it toppling over!
-Proper Tools for the Job
-Materials
-Assembly Step
If you have an unused step ladder lying around your house, now is the time to put it to use. You can turn it into an easy-to-use easel in a matter of minutes. Here’s what you’ll need:
-An unused step ladder
-Paint or a similar craft Material
-Step protectors or a canvas (optional)
When choosing which material to use for your easel, think about how you’ll be using it. If you’re painting, for instance, a canvas will help keep your hands free and off the ladder railings. If you’re just using the step ladder for light drawing or photographing projects, a step protector will suffice. Let’s get started!
Observe basic safety precautions when working with ladders, such as remaining aware of your surroundings and checking for obstruction before starting any project. You also may want to invest in a safety harness should your project require climbing up or down high places. The most important thing is to stay safe and have fun while creating!
What is a step ladder?
A step ladder is a piece of hardware that is used for reaching high places. It is a two-legged ladder with a handrail on each side. It can be made from a StepLadder.com or HomeDepot.com step ladder, or a regular ladder with the height increments cut off.
How to paint an easel
Easels can be a great way to boost your decorating appeal. Plus, they’re a great way to get your paintings off the floor and onto a more elevated surface. If you want to make your own easel, all you need is a step ladder. Here’s how to do it:
1) Decide what size easel you want. The smaller the easel, the easier it will be to move around.
2) Mark out the spots where the legs will go. Make sure that the corners of each leg are perfectly square with the edge of the ladder.
3) drill holes in each leg at the marked locations, using a screwdriver or drill bit that is just larger than the screws that will hold them in place.
4) Insert the screws into each hole and tighten them using a socket wrench. Be careful not to overtighten the screws, or you may damage your easel.
5) Stand your easel up on its legs and check for accuracy. If everything looks good, paint your easel whatever color you choose!
How to assemble the ladder
If you want to assemble a step ladder, here’s how:
1. Cut the steps so that they are the same length. This will ensure that the ladder is stable when assembled.
2. With two people, hold one end of the ladder while someone else screws the landing together.
3. Screw the top steps on, then screw the bottom steps on.
4. Finally, attach the handrail with screws or bolts and tighten them down.
How to attach the board and fabric?
To attach the board and fabric:
1. Attach one end of the string to the top rail of the ladder.
2. Position the ladder so that the string hangs over both sides of the art canvas.
3. Hold one end of the fabric up to the string, below where it is attached to the rail on the ladder, and pull it tight.
4. Repeat on the other end of the fabric and board.
Which one you should use?
When I was a child, my mom used to tell me that using a step ladder was the best way to make an easel. As an artist myself, I have to say she’s right! A step ladder is ideal for creating high-quality artwork because it’s easy to move and adjust. Plus, if you’re short on space, a step ladder can be a great option because it takes up minimal space.
If you don’t have access to a step ladder, you can also use a table or countertop as your easel. Just be sure to make sure your surface is sturdy and capable of withstanding the weight of your artwork. And like always, use safe practices when using tools—stay aware of how heavy your piece is and never stand on the piece while it’s still wet or painted!
ichever tool you choose, make sure to have fun with it and experiment with different art techniques!
-Tips
You don’t need a lot of expensive or complicated equipment to start painting. In this article, we’ll show you how to make an easy easel from a step ladder. Plus, we’ll include some great tips for creating beautiful paintings.
If you’re just getting started with painting, or you want to make your studio more efficient, building your own easel is a great way to go. It’s relatively easy to do and the results can be pretty amazing. All you need is some basic supplies and a step ladder.
Here’s how to build an easel from a step ladder:
 1) Place the step ladder in the desired position on your wall. Make sure the top of the ladder is at eye level so you can work comfortably. If necessary, adjust the height of the ladder until it’s just right.
2) Attach one of the step rails to the top of the ladder using screws or nails. The rail should extend about 2 feet above the top of the ladder. This will be your working surface.
3) Position your canvas on the rail and center it in front of you. Poke holes in the bottom corners of your canvas with a pencil
Safety Tips
-Making the Easel
-How to use the Easel
Making an Easel from a Step Ladder is a great way to create a handy working surface in any space. By following these safety tips, you can make sure your project stays safe and goes smoothly.
1. Always use caution while working with tools, especially when using a step ladder. Remember to keep both hands close to the ladder at all times.
2. Make sure your work area is clear of chairs, tables and other potential obstructions that could trip you or your ladder.
3. Always walk staircases and ramps slowly, keeping both hands on the railings.
4. When placing any object on or atop a step ladder, be sure to brace it against the steps below with both hands. This will prevent the ladder from tipping and will also help you keep your balance while climbing.
5. Keep children away from tools and step ladders until they are fully grown-no one knows exactly how dangerous they can be!
conclusion
If you are looking to make an easel from a step ladder, here are the steps!
1. Cut a piece of plywood that is large enough to fit your step ladder on one side and the wall you will be painting on the other.
2. Place the step ladder against the plywood and mark where the top of the ladder meets it.
3. Cut out the ladder portion of the plywood using a jigsaw or a saw.
4. Paint or stain the step ladder brown or any color you would like.
5. Mount the ladder onto the plywood using wood screws or nails and enjoy your new easel!