
Dimensioning is what may seem as one of the most difficult tasks of any artist’s arsenal, especially for those who are still learning about sketching and learning how to work with visual aid. With this in mind, an article titled “How To Dimension A Casting Drawing” will discuss ways to ensure a safe move from drawing to manufacturing when it comes to finding the length of your arm.
Before You Begin: Helpful Tips

When you are dimensioning a casting drawing, it is very important to have accurate measurements. Follow these helpful tips to make sure your dimensions are precise:
-Get an accurate ruler or a piece of collapsible steel tubing that is at least 1 inch in width.
-Measure the distances between features on the part and use that information to create dimension grid lines on your drawing.
-Create squarish endpoints for all dimensions (measure twice if necessary).
-Extend all dimension lines to their farthest point.
-Label all dimensions with letters and/or numerals.
Important Tools
When starting out on a casting drawing, it is important to have the correct tools at your disposal. Drawing tools can include rulers, grids, levels, and compasses. The most important tool of all, however, is patience. Casting drawings are often time-consuming tasks that require accurate measurements and precise marks to be made.
If you are not familiar with some of these drawing tools, there are plenty of resources available online or at local libraries. Before beginning your casting drawing, it is recommended that you practice using them by making quick sketches or small models. This will help ensure that your final product looks accurate and professional.
When measuring objects for a casting drawing, it is important to use common units such as inches or centimeters. Whenever possible, stick to consistent measurements so that whole objects or sections can be worked with ease. If you do not have any standard units available, there are conversion charts that can be consulted in order to convert between different measurement systems.
Whenever possible, it is also helpful to make reference photographs of the objects being casted. This way, you can accurately duplicate the details present in the photograph without having to physically measure them. Once you have made your measurements and sketches, it is time to begin drafting your dimensions
Benefits of Drawing Over Casting
When it comes to metal casting, there are a few factors that can affect the final product. One of these is the size of the mold. A casting drawing can be used to create a precise mold, eliminating the need for a trial run and potential waste. Here are four reasons why you should consider drawing over casting:
1) fewer steps in the manufacturing process: Casting is often done in an iterative manner where different parts are cast until they meet specifications. Withdrawal steps and clean-ups can be time-consuming and costly when done multiple times. By drawing a mold early on, you can save time and money by skipping these tests.
2) improved product quality: With a precise mold in place, you’ll have less opportunities for variations in production. This leads to a better-quality product with consistent dimensions from batch to batch.
3) reduced engineering costs: Casting products often require testing and retooling during manufacture due to variation in metal properties. By using drawings instead of molds, you can simplify these processes and thereby reduce engineering costs.
4) increased efficiency: Even small improvements in efficiency can lead to significant savings down the line. When designing for metalcasting, make sure to
The Drawing Process
The drawing process begins by starting with a basic outline of the object you’re creating. This outline should be as accurate as possible, so that you can create a more precise model later on. Once the outline is complete, start adding in details – this includes things like proportions, angles, and placement of features.
Once the details are finalized, you’ll need to start dimensioning your drawing. This involves estimating the size of different areas and drawing lines between them to ensure accuracy. Once all of your dimensions are in, it’s time to start filling in the details. Use smooth curves and frequent cross-hatching to help guide the viewer’s eye around the drawing.
Once the entire drawing is completed, you can finalize it by adding in any additional Effects or Colors if needed. Afterward, you can export your file and begin working on a model based on your finalized drawing!
Shapes to Value in Sculpting
When sculpting, it is important to have a way to determine the value of any shapes you make. There are a few ways to do this, but the most common is using proportions.
For example, if you want to create a triangle, draw a line from the top left corner of the triangle to the bottom right corner and then drawn another line halfway between those two points. This will give you the length of each side of the triangle.
Similarly, if you want to create a circle, you would simply draw a line from the center of your canvas to either one of its circumference points. It is important to note that these values will change depending on the shape you are creating – for example, a triangle will have longer Length and Width sides than a circle will.
Once you have determined the value of each shape, it is easy to add them together to get an idea of how large your sculpture will be. For example, if you want to create a sculpture of a human head with proportions that are 2:1 (width:height), you would add together the values for both triangles and circles that composed it – in this case, Width=4 and Height=2.
Basic Standards for Painting and Making Changelings
When it comes to painting and making changelings, there are some basic standards that you should follow.
- Use a light color for the body and dark colors for the fur and claws.
- Avoid highlighting any specific features on the changeling, such as eyes or horns.
- Be sure to give the changeling a lifelike appearance by including fine details, like wrinkles in clothing or small limbs that aren’t too muscular.
- Use warm shades of colors to show skin tones and cool tones for ice blue or other icy colors.
- To create realism, use images of changelings that are similar to your own creature in both shape and coloration, or find images of creatures in the natural world that you can use as inspiration.
How To Dimension A Casting Drawing
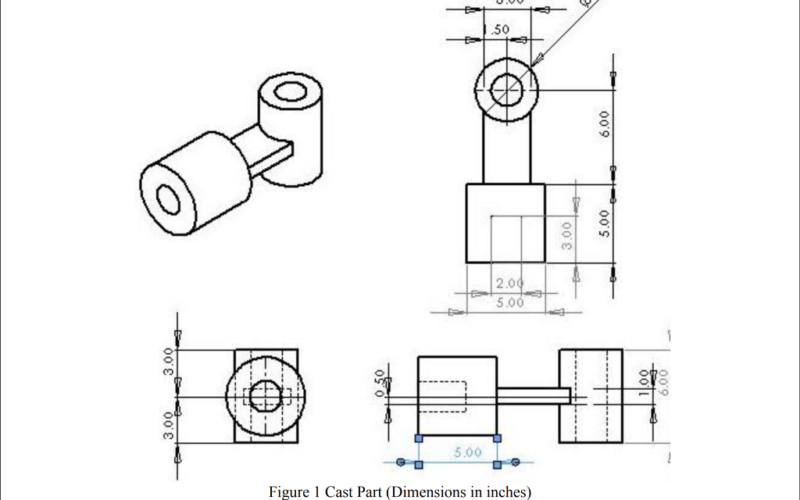
Castings often need to be dimensioned for specific purposes, such as the size and shape of the part being cast.
To accurately dimension a casting drawing, begin by sketching out the outline of the part. This will help you understand the dimensions needed for the final product.
Then, use measurements to create a drawing that outlines all the required dimensions. Be sure to keep your drawing accurate and precise, as this is how manufacturers will know how much material to order.
Finally, make copies of your drawing and save them in different file formats for easy reference. You can also attach sketches or photos of your part for a more descriptive drawing.
What are dimensions used for in drafting?
Dimensions are often used in drafting to size up andscale drawings to other drawings. They can also be used to help organize the flow of a design.
Dimensions are used in drafting to help determine the size, shape, and location of objects. When drawing a plan or drawing for construction or engineering, dimensions can be used to specify the scale of the drawing and to identify where objects will be located.
Dimensions can also be used in other situations where precise measurement is necessary. For example, dimensions can be used when sewing a garment together or constructing an object out of wood.
When specifying dimensions, always use precise measurements. Warped or incorrect dimensions can lead to inaccuracy in your drawings and can also cause problems when you try to build or fabricate the object using those drawings. In addition, using inaccurate measurements can lead to costly mistakes.
Always use accurate 29 inch lengths and indicate them as such in your drawings.
To dimension a casting drawing, first use the following tips:
-Decide what type of dimensioning system you will use: length, width, depth, or area (Acheson 2006).
– Decide how many dimensions you need and measure the object from corner to corner (Acheson 2006).
– Specify the dimension in inches, millimeters (mm), centimeters (cm), or another unit of measure
What is casting drawing?
Casting drawing is a type of technical drawing used to dimension parts for casting. It helps the caster to visually determine the size and layout of the part before beginning the casting process. Castings are often created from metal, plastic, or other materials that require precision in sizing and layout. Casting drawings can also be used to plan complex parts, such as assemblies or manifolds.
What are the 2 major methods of dimensioning?
Dimensioning is the process of measuring and describing the dimensions of an object. There are two main methods of dimensioning- planar and volume.
Planar dimensioning is used to Dimension a casting drawing. This type of dimensioning is done on a flat surface such as a sheet of paper. The dimensions are drawn in perspective, which means they represent how the object will look when it is finished.
Volume dimensioning is used to dimension a casting drawing that contains objects that will be disbursed or distributed throughout the drawing. Volume dimensioning is also known as coordinate dimensioning because it uses coordinates to represent where the objects will be placed in space.
There are several tools that can be used for planar and volume dimensioning. pencils, straight rulers, protractors, dividers and scales are all common tools for planar dimensioning. CNC (computer numerical control) machines can also be used for volume dimensioning.