

You spend a lot of time working on building and maintaining your current vehicle. It’s annoying when you go to start it up in the morning and have to wait for it to warm up for a couple minutes. I’m guessing you’re looking for ways to make that process easier? If so, check out this post on how to build a lube skid!
How to Build a Lube Skid
When it comes to fixing your car or bike, there is no denying the importance of lube. You can’t fix something if it’s not lubricated, and the same goes for your vehicle.
If you want to make sure that your skid stays put while you’re working on your car or bike, a good option is to build a lube skid. This can be extremely helpful in avoiding potential accidents, and it will also save you time and hassle.
Here are some tips on how to build a lube skid:
- Start by measuring the perimeter of the area where you plan to install the skid. This will help you determine the size and shape of the skid.
- Once you have determined the dimensions of the skid, cut a piece of flat metal that matches them. Make sure to measure and adjust the dimensions as necessary until you have an exact fit.
- Finally, drill holes into both sides of the metal strip, then screw it onto your car or bike using screws or nails. Be sure to use weatherproofing if necessary.
What is a Lube Skid
A lubrication skid is a type of snow clearing device that uses solvents to loosen and remove snow from a roadway. A lubrication skid usually operates on the principle of a rotary snow plow mounted with skids at the front and rear. Lubrication skids are often used in city streets where compacted snow and ice create hazards for motorists.
How to Build a Lube Skid
When constructing your own lube skid, you’ll need the following:
-A large pickup truck or SUV with a flat bed
-A hydraulic drill
-1/2″ diameter plywood or hardwood boards
-Two 1″ x 4″ lag screws
-Lubricant (such as WD-40)
-A brush tool
-Circular saw or hand saw
-Stiles (8′) to mount the skid on the truck bed
-Snow shovel OR corn cob pile (4’x4′)
Components of a Lube Skid
When considering building a lube skid, there are a few key components that need to be considered. The first is the surface on which the skid will be mounted. Many skids are designed to be mounted on trailers or other vehicles, so a smooth surface is important.
Another key component is the type of lubricant that will be used. Lube skids can be equipped with either an oil-lubricated or water-lubricated system. For oil-lubricated skids, an appropriate oil should be used (such as a diesel engine oil). For water-lubricated skids, water should be used in place of oil.
The third key component is the weight of the load that will be carried by the skid. For example, if a lube skid is being used to carry lumber, the weight of the lumber will affect how much pressure must be applied to the skid to keep it from moving.
Building a Samco Rollfast LubeSkid – Take Aways
There are numerous reasons why a business or facility might need a skid. They could be large enough to handle large pieces of equipment but too small for a tracked truck, or vice versa. A skid could help the business eliminate the need for expensive fleet maintenance and accident avoidance.
Thanks to the rollfast lube skid, these types of businesses can easily get the equipment they need without having to worry about making modifications or building something themselves. This type of skid is versatile and adjustable, meaning that it can work with almost any kind of machine.
Furthermore, this kind of skid is modular in design and can therefore be upgraded as needed. Thus, even if your current lube skid is not up to par, you can replace it with a newer model that offers more features and flexibility.
Here are some takeaways from this article about how to build a lube skid:
Soak that wood from the construction company
Soak that wood from the construction company with a common lubricant like WD-40. This will help prevent any splinters from happening during the installation process.
What you need to make a lube skid
Building a lube skid is a simple project that can be done by anyone with a bit of patience and ingenuity. The finished product will help you keep your bike running smoothly and free of debris, making it an essential part of your safety equipment.
The first thing you’ll need is some plywood or other sturdy surface on which to build the skid. You’ll also need a drill, saw, screws, nails, and sandpaper.
To create the skid’s frame, start by drilling pilot holes into the wood using the drill. Then use the saw to cut out the shape of the skid, being careful to not cut through the plywood below. Finally, screw and nail the plywood pieces together around the edges, being sure to use enough screws so that it’s stable but not too tight. Sand the edges of the skid so that they’re smooth and free from sharp corners.
Now you’re ready to add your lube dispenser. Start by cutting a hole in one side of your plastic bottle cap using a can opener or other sharp object. Then peel back the label and insert theifier tube into the hole. Make sure that it’s secured by crimping it around the edge of the hole.
Finally, screw on the cap to secure the tube and your lube dispenser is ready to use!
Materials needed for building your own lube skid
- Lube Skid
-If you are using an old pickup truck, you can build a lube skid by cutting a large hole in the bed of the truck and fitting the skid to the opening. If you are using a new truck, you can find lube skids made specifically for this purpose at your local junk or scrap yard.
-The dimensions of a proper Lube Skid will vary depending on your truck and your intended use, but they should be approximately 8′ wide by 4′.5′ deep.
-The bottom of the skid should have a smooth surface so that oils and other lubricants can spread easily. You can purchase pre-made skids or build your own out of plywood or other durable materials.
-Once you have selected the dimensions and material for your Lube Skid, it is time to install it. To do this, cut a hole in the ground or floor of your workshop and fit the plywood panel into the hole. Make sure that the bottom of the panel is level before screwing it into place.
-Now comes the fun part: filling your newly built Lube Skid with lubricant! You can use various oils , refined petroleum products, or even motor oil to fill the chamber. Once the Lube Skid is full, screw the top of the panel on and you’re ready to go!
Tips for building lube skids
Building a lube skid is an essential part of any snowmobile operation. Lube skids provide traction on hard surfaces and enable your snowmobile to move quickly and easily over the snow.
Here are a few tips for building lube skids:
- Choose the right material for your skid. The best lube skids are made from solid wood, plastic, or a combination of both. Avoid using metal because it will corrode over time.
- Plan your layout before you start construction. Layout the entire skid in your desired location on the ground, then determine where the pieces will go. Make sure to account for everything – including gaps between pieces – so that the finished product looks tidy and symmetrical.
- Start by constructing the base of the skid. Build it out of sturdy materials such as plywood or 2x4s, then attach it to the ground with screws or nails. If you’re using plastic or wood, be careful not to leave gaps where moisture can collect and cause rot later on.
- Next, build up the sides of the skid using more sturdy materials such as 2x6s or 2x8s. Be sure to screw or nail these pieces firmly to the base of the skid.
- Finally, add the final details – such as a railing or steps – and you’re ready to go! Lube skids are easy to install and can provide extra traction when snowmobiling on hard surfaces.
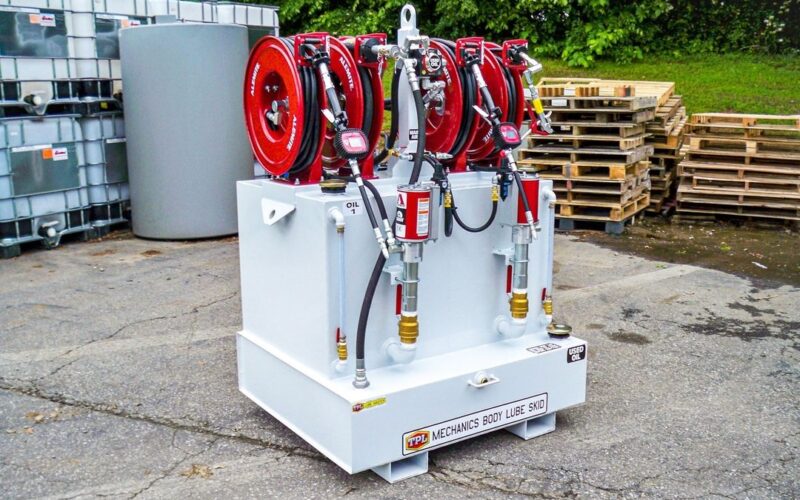
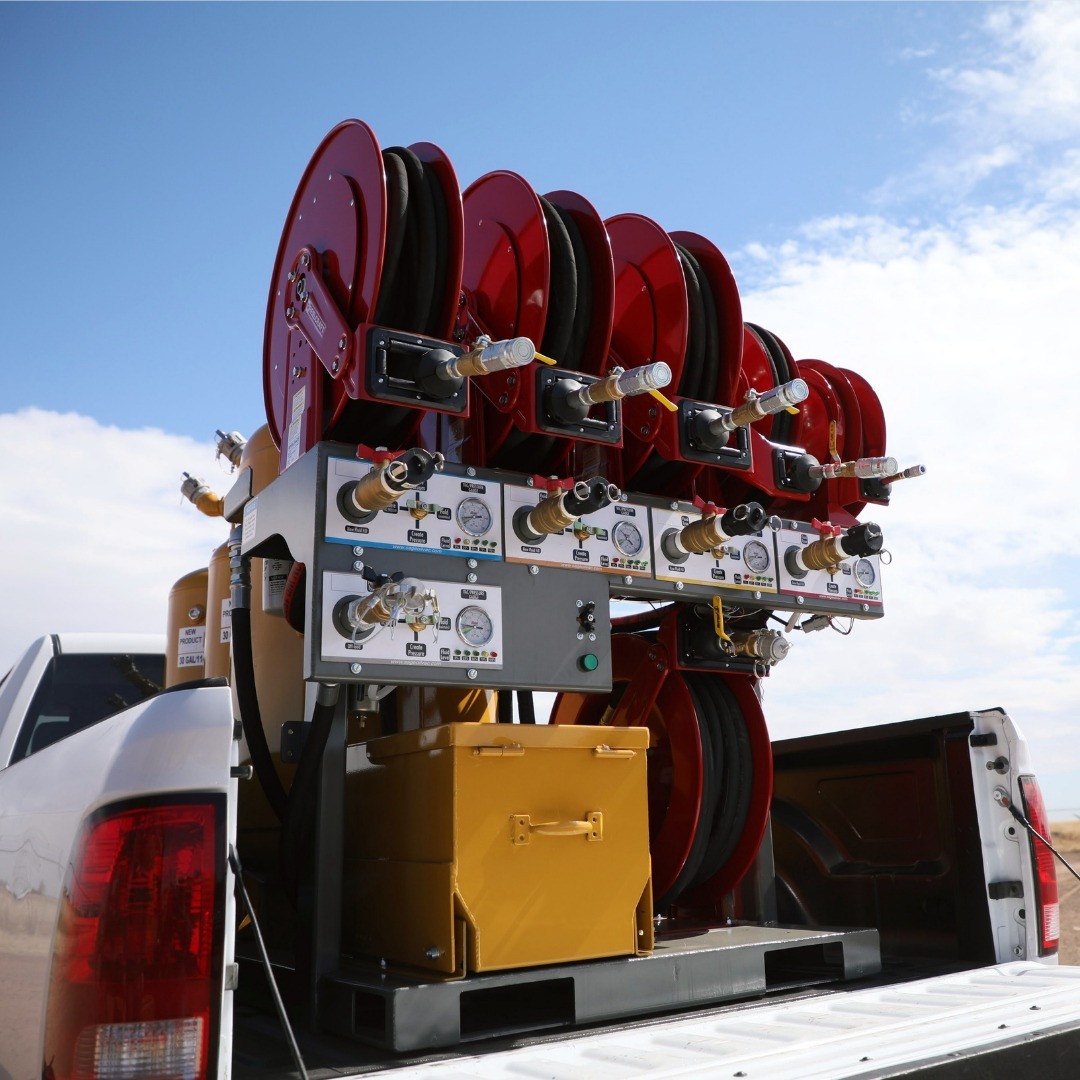
Parts of a Lube Skid
Building a lube skid is a great way to keep your vehicle lubricated while you’re out and about. There are a few different parts that make up a lube skid. The most important part is the lubricant reservoir. This part holds the lubricant and helps distribute it to the other parts of the skid.
Another important part of a lube skid is the lubricant distributor. This part disperses the lubricant evenly across the entire skid. It’s important to make sure that the lubricant distributor is properly lubricated so that it can distribute the lubricant evenly.
The last important part of a lube skid is the friction reducer. This part helps reduce friction between the vehicles and the skid. It’s also important to make sure that this part is properly lubricated so that it can reduce friction.
Drill Guidelines For Building a Lube Skid
Building a lube skid can save time and money on your projects. But it’s important to follow the right drilling guidelines if you want your skid to be stable and long-lasting.
When drilling for a lube skid, keep these guidelines in mind:
-Drill slowly and carefully to avoid creating vibrations that could cause the skid to fail.
-Use 75 psi or less pressure when drilling to prevent breakage.
-Check the drilled hole regularly for alignment and depth accuracy.
-If the hole is close to the surface, rough up the surface with a spade before drilling. This will help reduce friction and make the hole more slippery.
-Use metal fasteners when possible to reduce wear and tear on the skid.
Common Mods When Building a Lube Skid
When building a lube skid, there are a few common mods that you will want to consider. These are:
-Adding a water filter: This will help to keep contaminants out of your system, and also avoid clogging.
-Adding a salt water trap: This will help to remove contaminants and sediment from the water before it enters the skid.
-Installing a pump: This will help to create pressure and distribute the lube evenly throughout the system.
environmental issues
Green building is becoming more popular as homeowners, businesses and governments look for ways to save energy and protect the environment. In order to create a green building, it is important to consider the environmental impact of your projects from design to completion. Not only are you reducing pollution and saving energy, but you’re also protecting the natural resources used in production.
One of the most important aspects of green building is choosing the right materials and products. When selecting construction materials, be sure to account for their environmental impact. Some popular construction materials with high environmental impact include concrete, asphalt and plastic. When choosing products for your home or business, be sure to select those that have low environmental impact, such as recycled paper products and light fixtures made with LED bulbs.
Lube skids are a type of equipment used in mining operations. The skid is a large wheeled device that is mounted on an articulated arm so that it can move over loose material. Skids are used to move coal and other minerals from the mine to the loading point where they can be loaded onto trucks or railcars.
Environmental concerns associated with lube skids include noise pollution and air pollution generated by the burning of coal used in their manufacture. In addition,
the benefits of working with epoxy
There are many benefits to using epoxy to build your lube skid. Epoxy is a strong and versatile adhesive that can be heat-formed, which makes it a great choice for applications where durability is important. Additionally, epoxy bonds very well to many different materials, so it’s perfect for use in applications like this where flexibility is key. Finally, epoxy is easy to work with and can be sanded and painted without problems, making it a great option for those looking for a fast and simple project.
tips and tricks
Building a lube skid is a great way to increase your speed on ice and improve your traction. Here are some tips and tricks for constructing your own skid:
Choose the right material. PVC or steel tubing are both effective materials for building a skid, but each has its own advantages. PVC is cheaper and easier to work with, but it’s not as strong as steel tubing. Steel tubing is heavier and more durable, but it can be more difficult to manoeuvre.
- Get creative. There are many ways to build a lube skid, so feel free to experiment. You can use different angles and curves to get the best results, or you can use different materials to achieve different effects.
- Make sure the fit is perfect. Your skid needs to be slightly loose so that it can deform when in contact with the ice and move around as needed. Make sure the deck screws are tight enough so that the skid doesn’t move, but not so tight that they cause damage or impede drainage.
- Enjoy your new speed boost! Building a lube skid is a fun project that can help you improve your skating skills and overall enjoyment of ice hockey .
Final product
Building a lube skid is a great way to increase your off-road vehicle’s range and performance. This article will guide you through the construction of a lube skid and provide tips on how to improve your performance.
There are a few steps you’ll need to follow in order to build a lube skid. Start by constructing the frame of the skid. Use 1x4s and screw them together in a U formation, forming the base of the frame. Make sure that all edges are square and that there are no gaps between the boards.
Next, measure and cut 1x8s to size. The length of the skid will be determined by the width of your tires and the desired height of the skid. Cut two pieces of wood that will form the sides of the skid and attach them using brackets or bolts. Then, screw them into place using 1 inch screws.
Now it’s time to build the roof of the lube skid. Start by cutting four pieces of 2x6s to size, then attach them using hinges along one edge. Make sure that the hinge lines up with one of the screw points on the side panels so that they can open and close together.
Finally, attach the side panels to the top and bottom of the roof using screws. Be sure to leave enough room at the front and back so that you can fit your tires inside.
Now you’re ready to performance improve your lube skid! Tips on how to improve your performance include:
– Increasing air pressure in your tires. This will make them grip better on the road and help you to accelerate and brake more easily.
– Use a higher quality lube on your vehicle’s axle, wheel and drivetrain. This will keep everything running smoother and increase your speed and range.
Conclusion
I hope you have enjoyed this article on how to build a lube skid. This simple project can help keep your garage organized and make it easier to get the items you need when working on your car or motorcycle. If you’re looking for an easy DIY project that will have a positive impact on your life, building a lube skid is definitely one to consider!